Sunday, February 17, 2013

Valentine's Day: Heart-shaped Meatloaf

Happy Valentine's Day. Here are some Puritan Valentine's Day cards to inspire you until next year.

My husband told me this is the day wives get upset with their husbands. I said I could make it a day of resentment, unfulfilled expectations, and misery for him if that's what he wanted. (Note: We had a good laugh rather than filling our day with those abominable feelings.) 

But this was the first Valentine's Day I approached with pretty much no expectations, and as a result, I had such a wonderful day being with my family and feeling a basic, uncomplicated sense of happiness with my life and the people in it.

I'm discovering that holidays and birthdays are so much better when you approach them without high expectations. This year we didn't do gifts or dinner out; now that we have children we're trending towards the simplicity that this life requires. But since I wasn't expecting anything, I was certainly excited to receive some roses and Trader Joe's chocolate and peanut butter cups. I'll take it!

For dinner we had our second-annual heart-shaped meatloaf, inspired by a sister in my ward who does it every year. Meatloaf seriously gets a bad rap; I think it is one of the most brilliant and delicious foods when made well. A lamb meatloaf would blow my mind.

But for basic meatloaf, I think the trick is adding lots of breadcrumbs (more than any recipe asks for and instead of chunks of bread) and at least a cup of a shredded hard cheese. Lots of spices, just enough salt, eggs, milk, and ketchup (which I forgot for the photo). I don't use measurements or a specific recipe anymore with meatloaf, but the above combination of approximations seems to work every time.

And nothing says love like heart-shaped meat.

Wednesday, February 13, 2013

How to Make a Fabric Bulletin Board

The finished product.
I took up a recent undertaking to decorate a small room in much need of some life: the nursing lounge at the church. I've spent hours in there in the last two years with my first and second child, and I've long felt that the space could use a little color and excitement. 

The chairs are blue, the walls are now yellow, the carpet is blue, there's a gold-framed landscape painting on one wall. I'm picking up a small oak child's rocking chair tomorrow. But I thought the room needed one more touch to make it more personal: I decided to make a fabric bulletin board for baby pictures of children in the ward. I'm posting a call in our weekly newsletters for photos, and I can't wait to pin up those cute baby faces!

I followed this tutorial by freshvintage as a guide, but since I did a few things differently I thought I'd write my own how-to. Here goes!
______________________

HOW TO MAKE A FABRIC-COVERED BULLETIN BOARD

MATERIALS
  • Corkboard
  • Fabric of choice
  • Iron
  • Paint (spray or liquid)
  • Drop cloth or newspaper
  • Masking tape
  • Iron-on double-sided fusible interfacing (available at JoAnn's or any quilting/fabric shop)
  • Rotary cutter and mat (or scissors and measuring tape/ruler)
  • Glue (I used Elmer's all-purpose, but you could be all fancy and use fabric or hot glue)
  • Craft felt, ribbon, or rick-rack (in a color that accents your fabric and frame)
  • Blow drier (if you want your paint to dry faster)
INSTRUCTIONS
    1. Obtain or make a framed cork board. You could make a huge one out of insulation board from Lowes and staple the fabric onto it. You could find a thrift bulletin board to work with. You could use an existing frame and insert a piece of cork cut to size. Or, you could go to Target like me and just buy a nice new inexpensive corkboard. I got this pretty large one for $17.00.

    2. Paint the frame. Spread out your drop cloth or newspaper to paint over. Put your kids to bed or lock them away. Use the masking tape to protect the corkboard if you're brushing on paint, or cover it completely with paper and tape if you use spray paint.

    I pulled out some gold acrylic paint I've had for years. All in all, I tried to make this project using what I already had--I am all about simplicity (and not going to the store more than I need to). So be creative working with what you've got!


    This black Target frame took three or four coats of paint, a gold irridescent that I thinned with some Liquitex glazing I have because I was worried I might run out of the gold if I used it straight up. 

    The finished paint job doesn't look great up close--you can see my chunky brush lines, but I tell myself that the hand-painted textured look gives it a nice touch--just to make myself feel better.


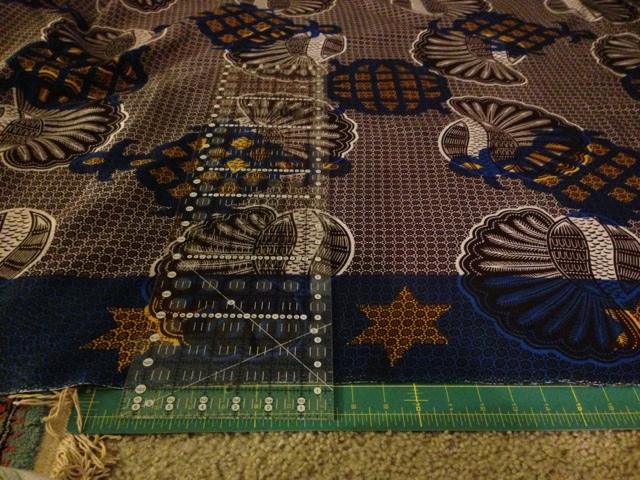
    3. Press your fabric with the iron and cut it to size. The rotary cutter, ruler, and mat will give you super straight lines and accurate measurements. But if you don't have these, (like I said earlier), work with what you've got! That's what thrift is all about right?

    This fabric is some beautiful yardage from Africa that my sister-in-law got for me during her Peace Corps service in Botswana. I think it's so striking.


    4. Lay your fabric on the board. Make sure it fits fairly well, but don't worry if the edges aren't perfect because that's what your ribbon/felt/rick-rack trim will hide. My trim is a 1/4" if that gives you an idea of how much room there is for error. 

     
    5.  Use the fusible interfacing to adhere your fabric to the board. I was working on this last night, feeling so irked that I didn't have any spray-adhesive glue stuff and I couldn't just go out and buy some right then, nor did I want to go out and buy it at all. I stewed over what might work that I have and I remembered I had leftover fusible interfacing from the recent reupholstery project I did.

    I love how well it worked. I actually recommend this rather than using a spray glue because it's cheap and not as messy and maybe even more environmental (sans aerosol can). If you have enough interfacing to cover the whole cork board, awesome. I only had a little left, so I cut up what I had and stuck it on like so:


    Not having the whole cork part completely covered with interfacing worked wonderfully! The fabric is super smooth on there after pressing it down with no bubbling at all. And considering its going to get covered with photos and thumbtacks, it doesn't really matter anyway.

    6. Using your rotary cutter and ruler again to cut 1/4" strips of craft felt. Note: the strips do not have to run the length of the board. You won't be able to tell where pieces meet up if they're cut straight and to size. See the photo below. Can you see where the two strips meet? Not really? Neither can I.


     7. Glue your fabric strips around the edges of the frame. I know real crafters use fabric glue, but how often do I actually glue fabric? Pretty much never. I used Elmer's glue for this small little step and (whoa!) it worked just fine.


    8. Hang it up and pin things on it! Yay!

    Nursing Lounge 2.0
    ___________________________

    And now that I finished this one for the church, I totally want one for myself! Looks like I've got more crafting to do. Woe is me.

    Thursday, January 31, 2013

    Mexilasagna: An Enchilada Casserole (gluten-free)


    When I stopped eating wheat, I was a little disheartened by the thought of not eating enchiladas, one of my favorites. But the reintroduced the corn tortilla to our household and all is well in the world again. So this can be a gluten-free recipe if you use a gluten-free enchilada sauce--which most probably are unless there's a wheat-based thickening agent.

    Since corn tortillas don't roll up well without breaking apart, layering the tortillas with filling like a lasagna works so well. This is my old enchilada recipe simply served in a different form. So good.
    ________________________________

    Ingredients

    Filling
    1 8-oz box cream cheese or Neufchâtel (1/3 less fat)
    3 boneless skinless chicken thighs, cooked and cut into small pieces
    1 small onion, 2 green onions, and 1 red bell pepper, diced and sautéed in 2 Tbs oil w/ dash S&P
    1 small can diced green chilies
    (optional) 1 small can green Salsa Mexicana 
    1 C shredded Mexican and/or cheddar cheese blend
    1 Tbs chili powder
    1/2 tsp garlic powder/garlic salt
    1/2 tsp paprika

    Layers
    White or yellow corn tortillas
    1 can enchilada sauce (green or red)
    1 4-6oz can red Salsa Mexicana
    More cheddar/Mexican cheese to sprinkle between layers and on top
    3 green onions, diced (save 1/3 to sprinkle on top as garnish)

    Serve with
    Sour cream
    Your favorite hot sauce
    Your favorite green or red salsa
    Avocado
    etc.

    Directions
    Cook the chicken thighs (sauteed, Foreman-ed, baked, whatever) and dice them up. Sautee diced peppers and onions with S&P. Set aside to cool as you mix the filling ingredients in a standing mixer or by hand.

    In a 9x13 ungreased pan, pour 1/2 C of the enchilada sauce to coat the bottom of the pan. Layer corn tortillas on the bottom, breaking a tortilla into pieces to fill in the gaps.

    Spread a layer of filling, then pour a little enchillada sauce on, then a sprinkle of cheese, then another layer of corn tortillas. Spread a second layer of filling, and this time, top with that one small can of Salsa Mexicana. Sprinkle with cheese, add another layer of corn tortillas, etc.

    After your last layer of corn tortillas, pour the remaining enchilada sauce on top, then a hearty layer of cheese. Sprinkle with the third of the diced green onions you'd set aside.

    Bake in the oven at 375 degrees for 30 minutes or until the cheese is golden brown. Serve hot.

    Thursday, January 17, 2013

    Christmas Recipes: Peppermint Bark & Candy Molds


    Another belated Christmas project. There was an evening before Christmas when I was completely done in; I'd had it with Christmas and all the demands of the season and the loss of sleep and the similar loss of time to do anything I wanted to do, so right then, even though my husband was sleeping and the baby was crying, all I wanted to do was assemble bags of peppermint bark and candy mold treats to give away and not take care of anything or anyone else because somehow the peppermint bark would take care of me me me me me me me me meeeeee so too bad, family! IF I DON'T DO THIS, CHRISTMAS WON'T EXIST

     That's the trouble with traditions.

    I admit that eating at least half a cookie sheet's worth of peppermint bark over the course of just a few days did help, but it did not dissolve the unnecessarily sky-high levels of stress that entered our home in preparation for Christmas. In fact, it contributed as I tried to both lengthen our list of family traditions and execute all of them with extravagance.

    Merry Christmas. Here's my recipe. Use with caution because I'd actually never done this before and made it up, so you're probably better off looking up a real recipe somewhere else.
    _________________________________

    PEPPERMINT BARK RECIPE
    woof woof

    Ingredients
    Vanilla candy melts
    Dark or milk chocolate candy melts (or both)
    Crushed peppermint candy or candy canes (I bought those huge ones from the dollar store and smashed them with a hammer)

    Directions
    Melt the chocolate candy melts according to instructions. Pour and spread a thin layer (1/8"?) evenly on a cookie sheet or pan lined with foil or parchment paper.

    Before it sets, pour on the layer of vanilla [somehow] evenly over that. (Note: This is where I went wrong; I let the chocolate set before pouring on the vanilla so when it all cooled and I went to break it in pieces, the chocolate layer broke off and separated from the vanilla layer.)

    Before the vanilla sets, sprinkle the peppermint over the top with a spoon or your fingers or a sprinkling contraption.

    Let cool completely. Setting the chocolate in the fridge or outside in the cold works really well, and really quickly. Then break or cut the bark into pieces with a large, sharp, potentially lethal knife.

    Homemade Felt Christmas Ornaments

    As if Christmas weren't stressful enough [to the point that I'm just now recovered enough to post something Christmas related], here is evidence of some little felt ornaments I made as party favors for a "Simple Gifts"-themed gift exchange:


    They're just rectangles of craft felt blanket-stitched together with two cotton balls inside to make them puffy. I "wrapped" each of them in square tin boxes in a bed of that red and green crinkly paper-straw stuff for the guests.


    Too bad I decided that, yes, I really needed to embroider "'Tis a gift to be simple" on each little ornament, like I had time for that sort of thing, which (evidently) I did. Somehow. Crafting obviously falls somewhere on my list of priorities slightly under screaming child (or does it?) and eating handfuls of chocolate-covered raisins.

    Wednesday, January 16, 2013

    Homemade Flavored Butter


    I was whipping up some cream for a strawberry shortcake party and left the Kitchen Aid running a bit too long. When I came back, the cream had separated into some kind of weird chunky stuff in watery liquid.

    Turns out that's how you make butter.

    Just for jollies, I strained and kept it, forming it into this little cake an a small ceramic bowl. And guess what? It turned out deliciously! (Of course it did--it's butter.) I had added a little vanilla, a touch of sugar, and lemon zest to what I thought would become whipped cream and ended up with a lemony, sweet butter spread instead.

    So I assume that if you want to make some kind of flavored butter, just add what you want to some whipping cream, turn your mixer on high, and forget what you were doing because you'll come back to something fattening and delicious--a winning combination.

    Easy Shelving: Apple Crates

    I remember hanging a small wooden crate in the bathroom of one of my college apartments to use as a small shelf. I mean, what college student can afford to outfit a rental apartment W.C. with brand-new cabinetry?

    So when a friend recently brought dinner over in this little apple crate, I knew exactly what to do with it:


    Cute, simple, and useful!